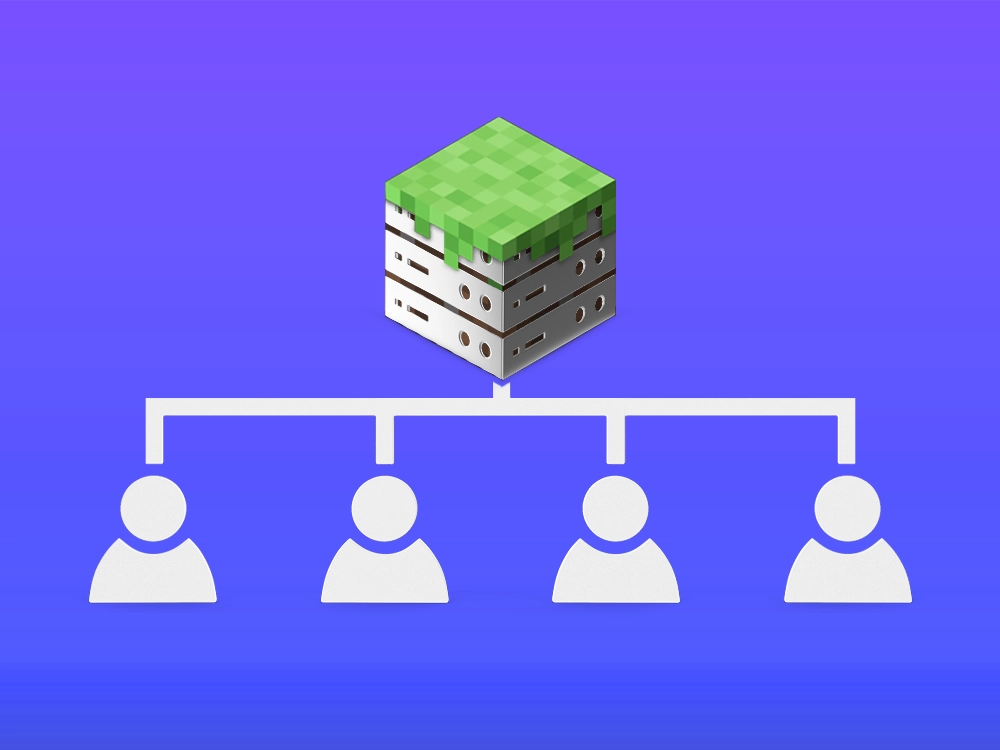
Congratulations, you made your first Minecraft server, and now you are ready to end the loneliness of being the only one in the server. With the ease of Port-Forwarding, your friends join your server and play with you.
Port-forwarding a Minecraft server allows players from around the world to join your server. Before diving into the specifics for Windows, Linux, and macOS, ensure you’ve covered these essential preparation steps to avoid common pitfalls.
- Set Up Your Minecraft Server: Always make sure to have created a server before doing the port-forward. Click here to learn how to make a Minecraft server.
- Find your router: You will need to take a look at your router later on in this guide, make sure you know where your router is located.
Quick Navigation
- What is Port-Forwarding
- How to Port Forward a Minecraft Server
- Step 1: Configure the Minecraft Server Port in Server Properties
- Step 2: Allow the Minecraft Server Port Through the Firewall
- Step 3: Set Up Port Forwarding on Your Router
- Step 4: Start Your Minecraft Server and Play with Friends
- Conclusion
- Troubleshooting
- FAQs About Port-Forwarding a Minecraft Server
What is Port-Forwarding
Port forwarding is a networking process that allows external devices to connect to services hosted on your local network. For example, if you’re hosting a game server like Minecraft on your computer, friends cannot connect using an internal IP address (e.g., 192.168.0.1) because it only works within your private network.
With port forwarding, your router is configured to redirect incoming traffic from specific external ports to the internal IP address of the device running the server. This makes your local game server accessible to players over the internet. Most modern routers include port forwarding as a built-in feature, which you can set up by logging into the router’s admin panel through its default gateway.

How to Port Forward a Minecraft Server
To make your Minecraft server accessible to players worldwide, you’ll need to identify its default port, configure your firewall to permit traffic, and adjust your router settings for port forwarding.
Let’s keep reading to learn how to accomplish each of these steps!
💡Tip: Before you Port Forward, you need to set up a Minecraft Server.
Step 1: Configure the Minecraft Server Port in Server Properties
When port forwarding, we need to know which port we are using for our server to establish a connection. This number typically consists of 5 digits and is located within our server.properties file.
These the default port numbers for Minecraft:
- 25565 – in Java Edition.
- 19132–19133 – TCP and UDP (both) ports in Bedrock Edition.
Let’s double-check our port number.
- Find the folder containing your server.properties file, locate and open said file with a text editor (notepad works)
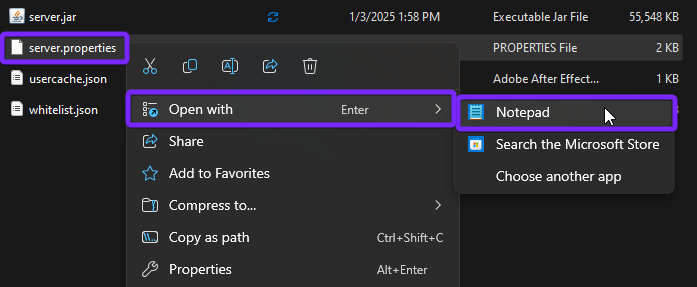
- Inside this file, locate the line that says “server-port”
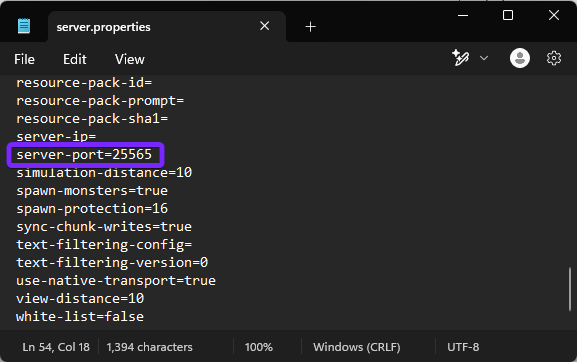
- Adjust the
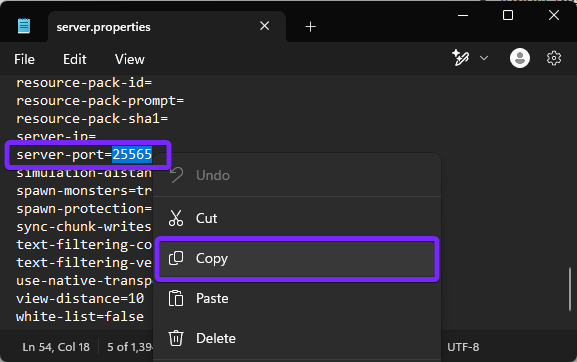
server-portvalue to any number between 1–65535 (default port number). With that said, it’s usually best to use the default port unless you have a particular need to configure it differently, like when you are hosting more than one server in the same computer. - Copy or write down your server-port number, save the changes, and close the text editor.
Step 2: Allow the Minecraft Server Port Through the Firewall
To ensure your Minecraft server can receive incoming connections, you’ll need to allow its port through your computer’s firewall. Firewalls are designed to block unauthorized traffic, so granting permission for the Minecraft server’s port is a necessary step for connectivity.
Windows Firewall Configuration
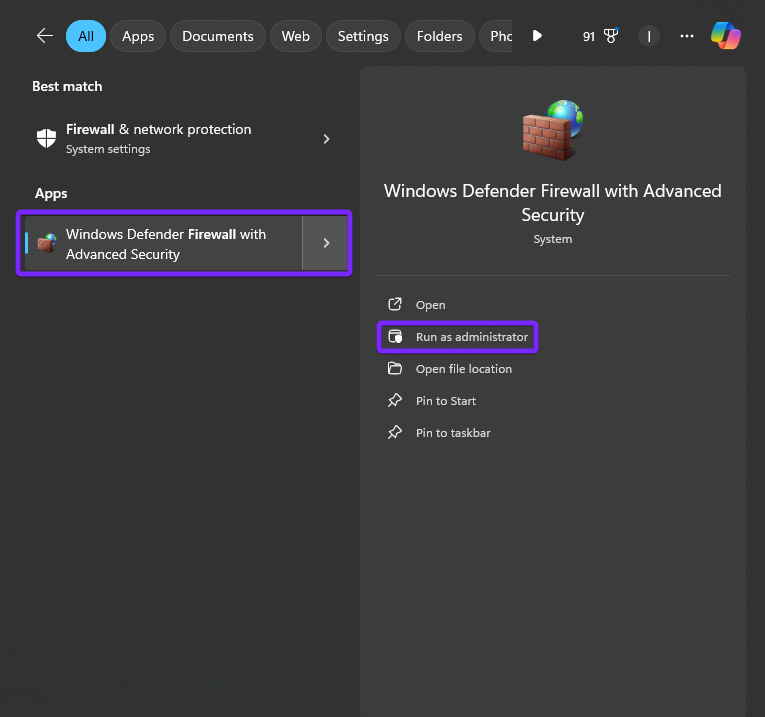
- Launch your Windows Defender Firewall with Advanced Security, you can find it using your search bar.
- Select Inbound Rules and then click New Rule…
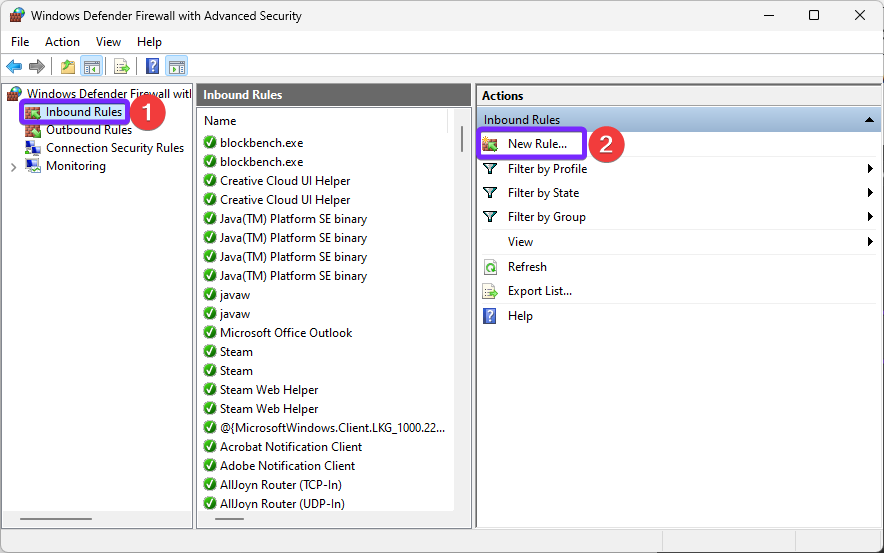
- In the New Inbound Rule Wizard, within the Rule Type, choose Port and hit Next.

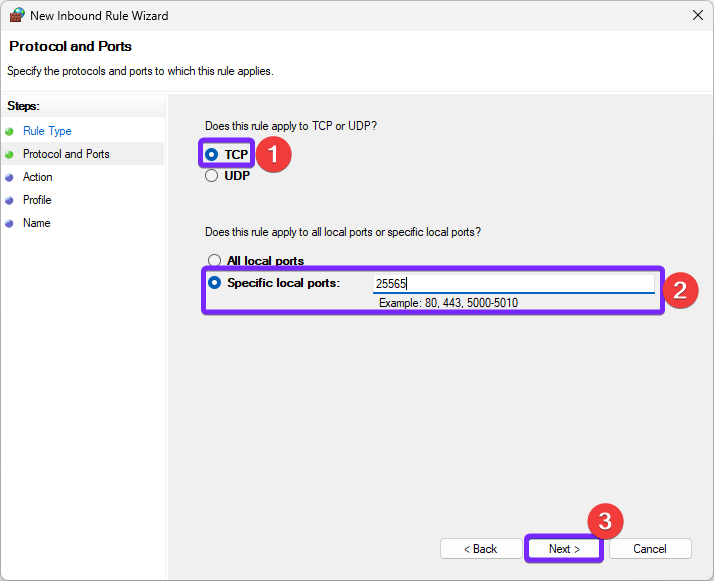
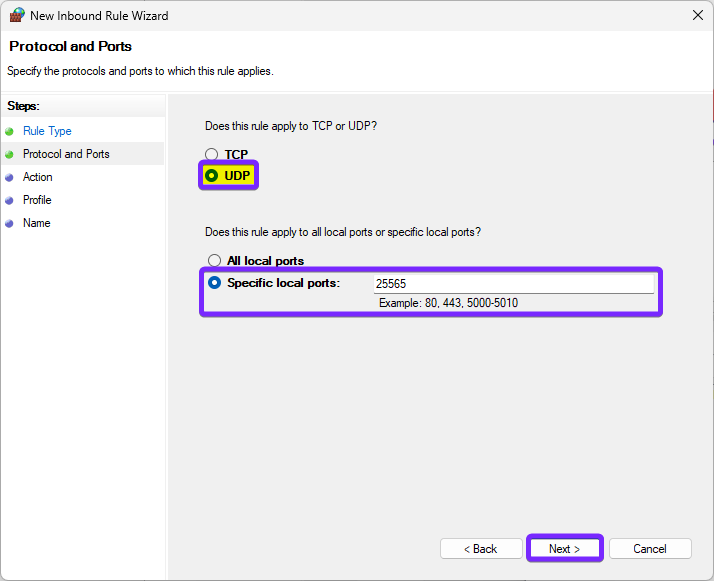
- For the Protocol and Ports, select TCP and for the Specific Port add your port number from earlier, in this case we are using the default 25565, click Next.
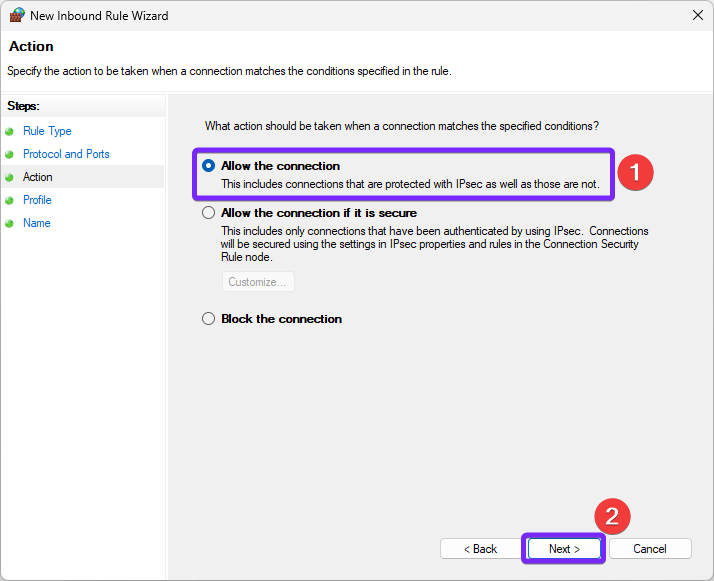
- Within the Action menu, select Allow the Connection and then Next.
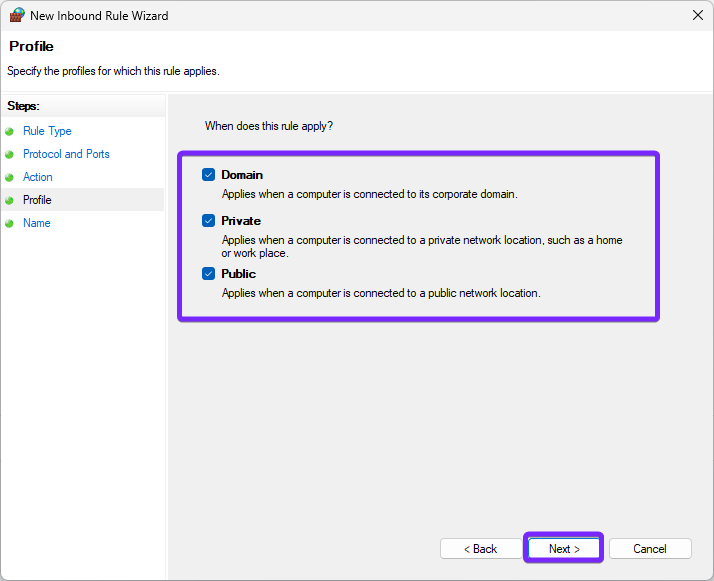
- Within the Profile option, make sure Domain, Private and Public are selected and press Next.
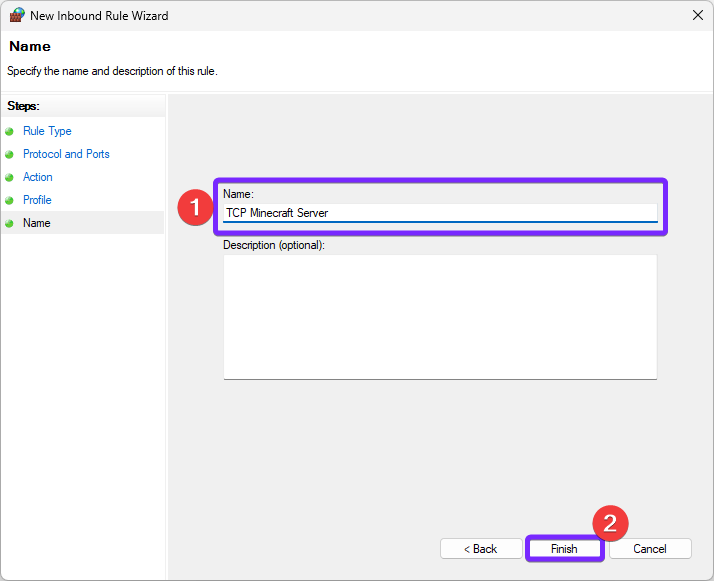
- Finally, assign a name to the new rule. It’s best to use something Minecraft-related so you can easily identify it in the future.
- Once you’ve completed the TCP rule, repeat the process to create a UDP rule. The steps will remain the same, but this time in the Protocol and Ports, choose UDP, ensuring both protocols are properly configured for your Minecraft server.
macOS Firewall configuration
- Open System Settings and within Network, click the Firewall option.
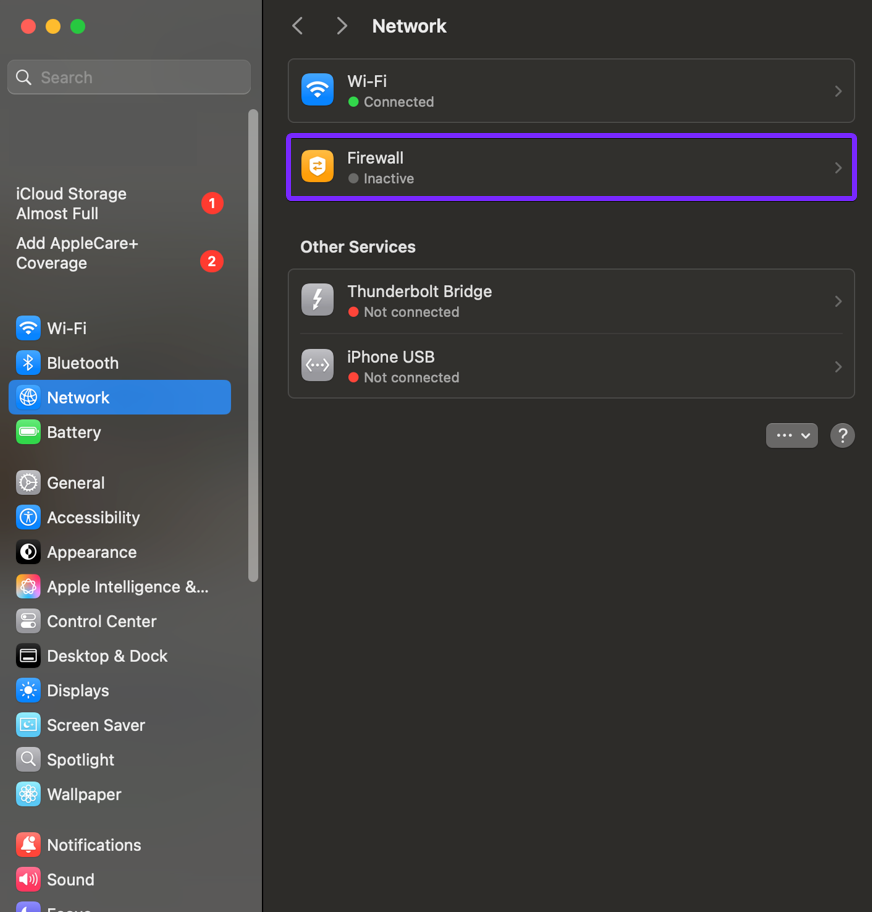
- Click Add, locate Java from the list, and confirm your selection. Ensure the Allow incoming connections option is checked, then click OK to save your changes. This step enables Java to handle the traffic required for your Minecraft server.
Linux Firewall configuration
- Open a terminal and run the following command to allow traffic on the Minecraft port:
sudo ufw allow 25565/tcp
sudo ufw allow 25565/udp- If the firewall is disabled, activate it with:
sudo ufw enable- Confirm the rules are applied by running:
sudo ufw status- Look for entries similar to:
25565/tcp                 ALLOW       Anywhere
25565/udp                 ALLOW       Anywhere
These steps ensure your Linux firewall allows traffic to and from the Minecraft server port.
Step 3: Set Up Port Forwarding on Your Router
With the firewall configured to handle incoming network requests, the next step is to create a port forwarding rule on your router. While the interface may vary between router brands and models, the overall process is generally the same. Take your time to locate the port forwarding settings, as this step is crucial for making your Minecraft server accessible to players online.
Find Your Router’s IP Address
Windows
- Open the Command Prompt by pressing Win + R, typing cmd, and hitting Enter.
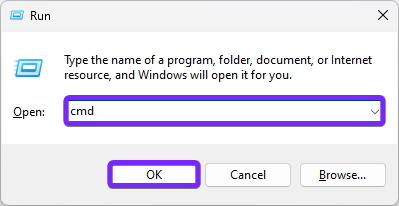
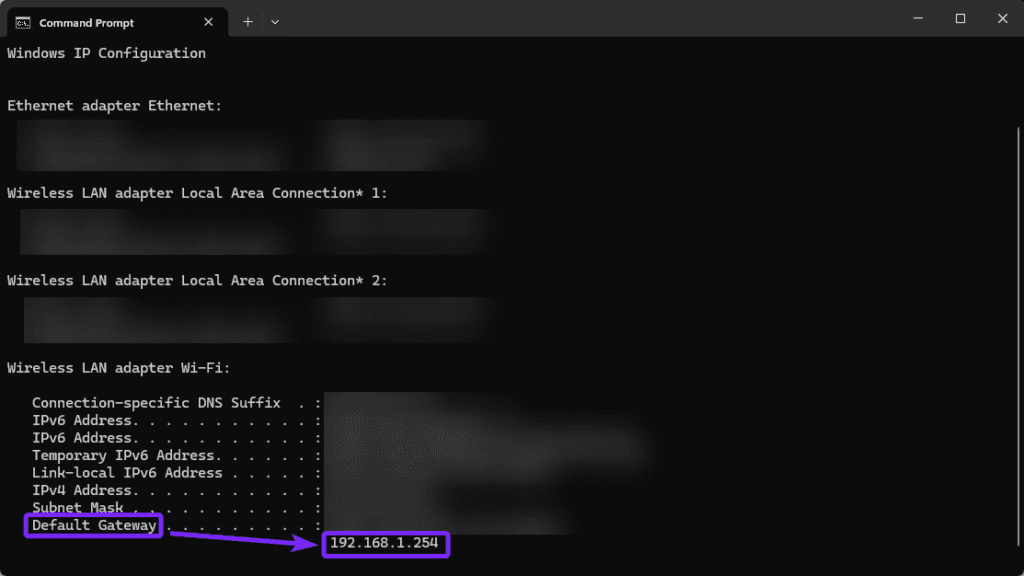
- In the Command Prompt, type ipconfig and press Enter.
ipconfig- Look for your Default Gateway under your active network connection. This is your router’s IP address.
Copy your router’s IP address and head to the next step to set up a static IP address.
macOS
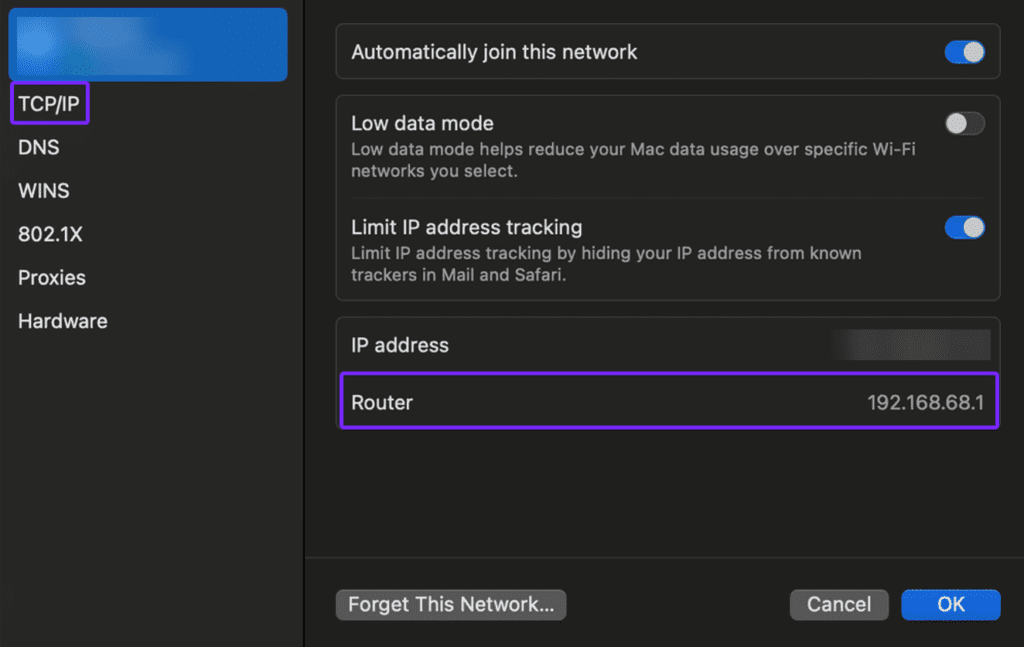
- Open your System Settings and, in the Network window, choose your active connection (e.g., Wi-Fi or Ethernet) from the list on the left.
- Go to the TCP/IP tab. Look for the Router field. This is your router’s IP address (e.g.,
192.168.68.1).
Save your router’s IP address and head to the next step to set up a static IP address.
Linux
Finding your router’s IP address on a Linux system is simple. Here’s how:
- Press
Ctrl + Alt + Tto launch the terminal, or search for “Terminal” in your application menu. Type in the following command and press Enter:
ip route | grep defaultThe output will display a line similar to the one below, where the number after via (e.g., 192.168.1.1) is your router’s IP address.
default via 192.168.1.1 dev wlan0Remember your router’s IP address and head to the next step to set up a static IP address.
Set Up a Static IP Address
A static IP ensures your router can always route incoming traffic to the correct device. This way, players will always be able to connect to your server without interruptions caused by IP address changes.
💡 Tip: If your server is only temporary or for short-term use, you can skip this step.
Windows
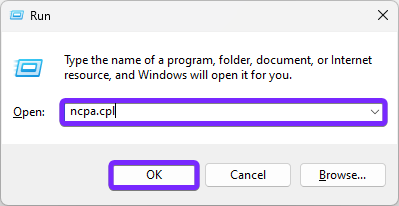
- To set up a static IP address, press Windows + R, type
ncpa.cpl, and press Enter. This will open your Network Connections window.
- Right-click on your active network connection (e.g., Ethernet or Wi-Fi) and select Properties.
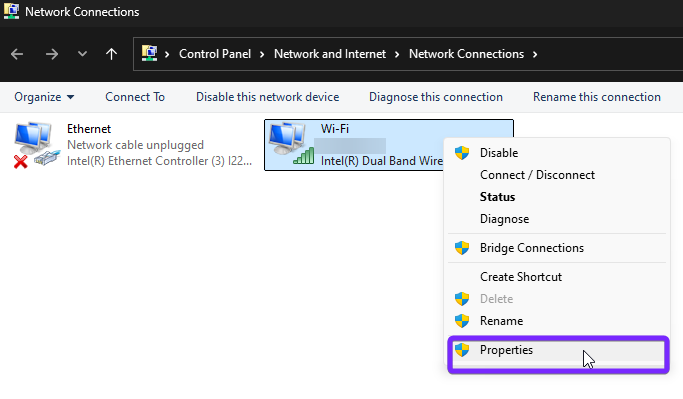
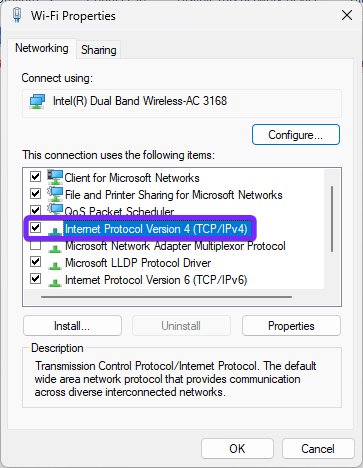
- In the list of items, scroll down and double-click Internet Protocol Version 4 (TCP/IPv4).
In the new window, select Use the following IP address and fill in:
- IP Address: Choose an address in your network range, such as
192.168.1.100, you can look at your default gateway address and just change the last digit after the period. - Subnet Mask: Typically,
255.255.255.0. - Default Gateway: Enter your router’s IP address (the one we copied in the previous step).
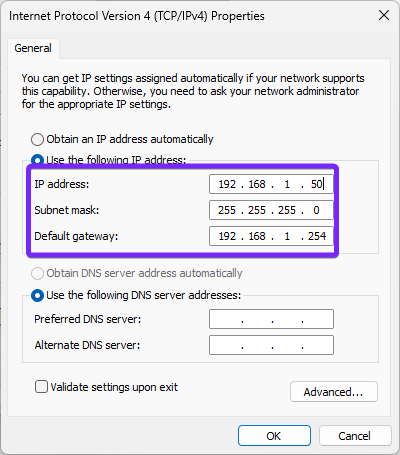
- Once you entered the info, click OK to save the settings.
You can now move on to the next step, to log into your router.
macOS
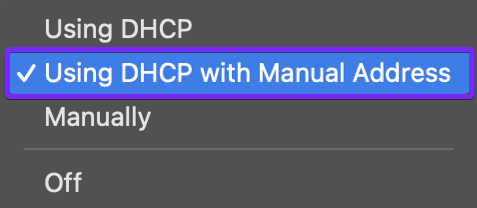
- Go to System Preferences > Network and select your active connection. Click Advanced in the bottom-right corner.
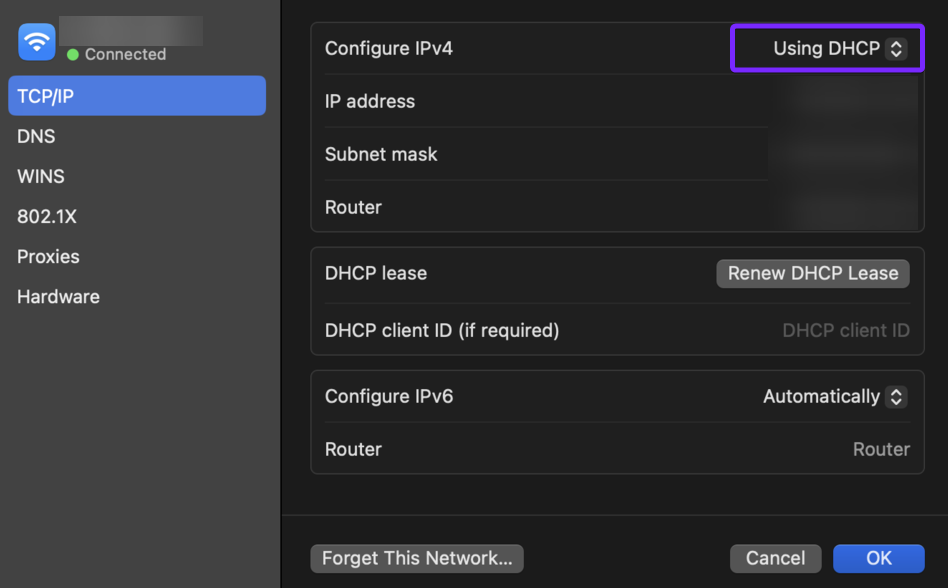
- In the TCP/IP tab, set Configure IPv4 to Manual Address.
Now Enter:
- IP Address: A static address in your network range (e.g.,
192.168.1.100). - Subnet Mask: Typically
255.255.255.0. - Router: Your router’s IP address. (The one we saved in the previous step)
Click OK to save and then Apply.
You can now proceed to the next step to log into your router.
Linux
- Open a terminal and run the following command to view your current network settings:
ip a- Note your current IP address, subnet mask, and default gateway. For example:
- Open the network configuration file in a text editor. Most Linux distributions (e.g., Ubuntu) use Netplan for managing network settings:
sudo nano /etc/netplan/01-netcfg.yamlIf the file doesn’t exist, create one or check for a file with a similar name in the /etc/netplan directory.
- Update the file to include your static IP configuration. For example:
network:
  version: 2
  renderer: networkd
  ethernets:
    eth0:  # Replace "eth0" with your network adapter's name
      addresses:
        - 192.168.1.100/24  # Static IP and subnet mask
      gateway4: 192.168.1.1  # Default gateway
      nameservers:
        addresses:
          - 8.8.8.8  # Primary DNS (Google DNS)
          - 8.8.4.4  # Secondary DNS
Replace the values with your network information. (We located this in the previous step)
- Save and exit the editor (
Ctrl + O,Enter, thenCtrl + X). - Apply the new network settings using:
sudo netplan apply- Verify the new settings:
ip aYour Linux device now has a static IP address, ensuring your port forwarding rules remain consistent and functional.
Accessing the Router and Opening the Port
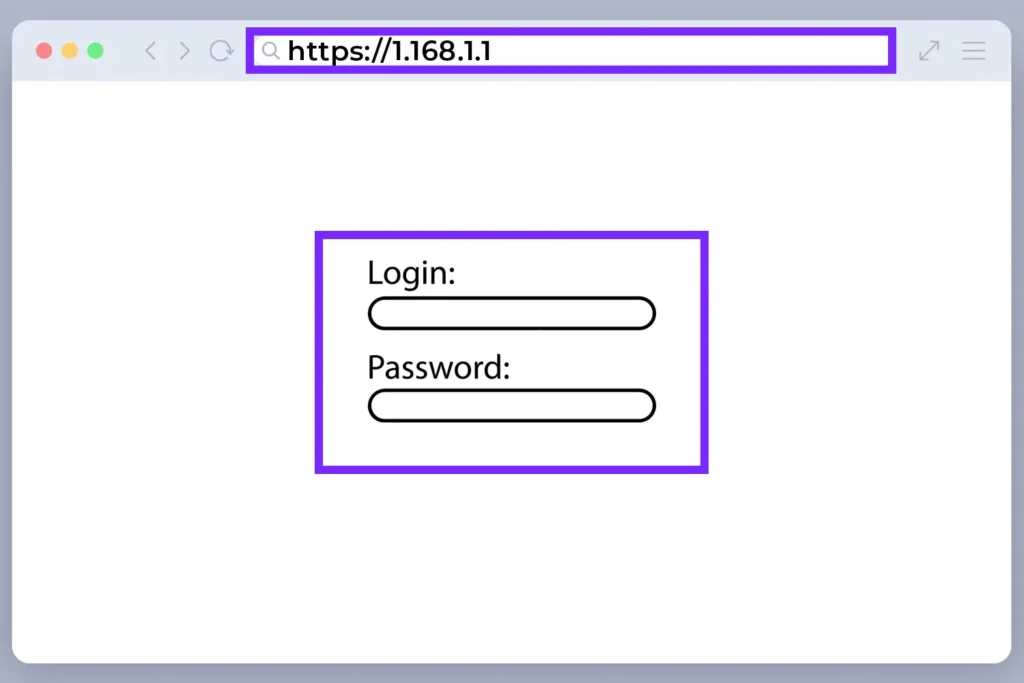
- Type or paste your router IP address in your web browser’s search bar and hit Enter. You will now see a login menu for your router configuration.
- Enter your router’s admin credentials. These are often printed on the bottom or the back of the router itself or provided by your ISP.
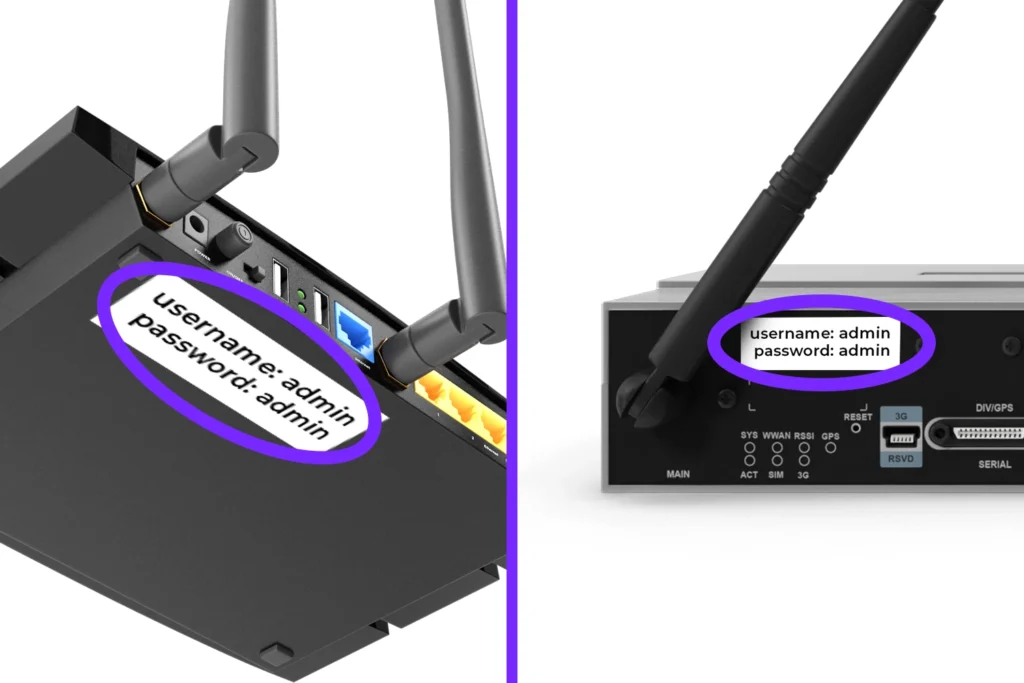
There are some common defaults:
- Username:
admin - Password:
adminorpassword
If you changed the login details and forgot them, you might need to reset the router to factory settings. You can also google your specific router’s info to find the proper instructions for your specific router.
- Once logged in, you’ll see the router’s admin interface. Look for settings like Port Forwarding, NAT, Firewall, Virtual Server, Security, Gaming or similar. You might have to do a bit of looking around to find the proper tab.
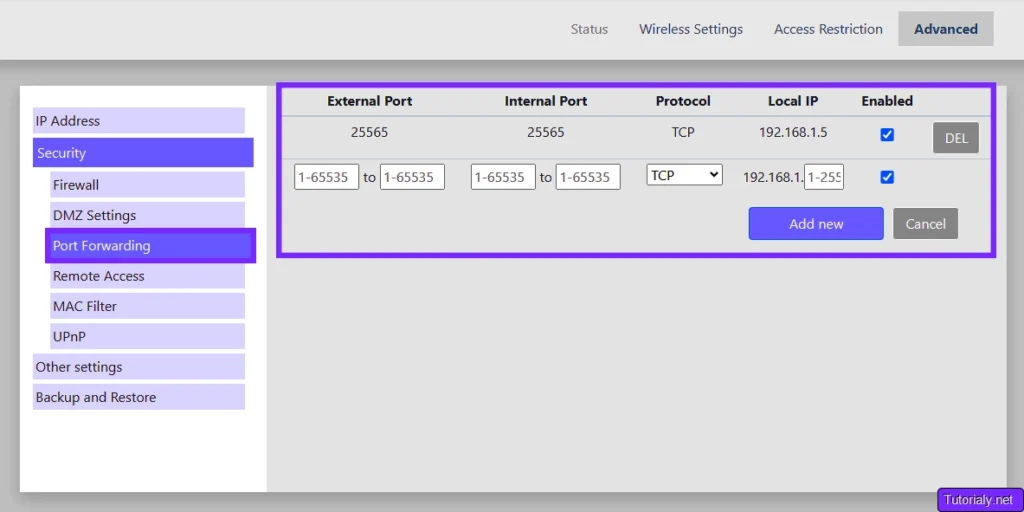
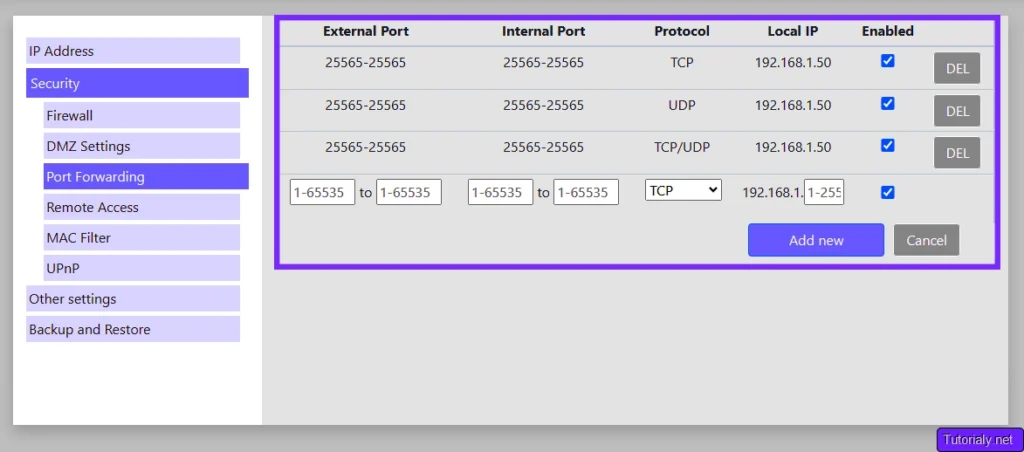
- Enable Port Forwarding and create an instance, you are going to input your Minecraft server port number (25565 by default) in the External/Public Port as well as in the Internal/Private Port.
- Set the Protocol Type to TCP and UDP. If your router offers a “Both” option, select it to configure both protocols at once. If the “Both” option isn’t available, you’ll need to create separate rules for TCP and UDP individually.
- Enter your static IP for the Local/Private IP option, if you haven’t set up a static IP, you would use your current local IP address when configuring port forwarding.
💡 Tip: Make sure the static IP is correctly assigned to avoid conflicts or connection issues.
Once you’ve entered the correct information on the port forwarding page and saved the settings.
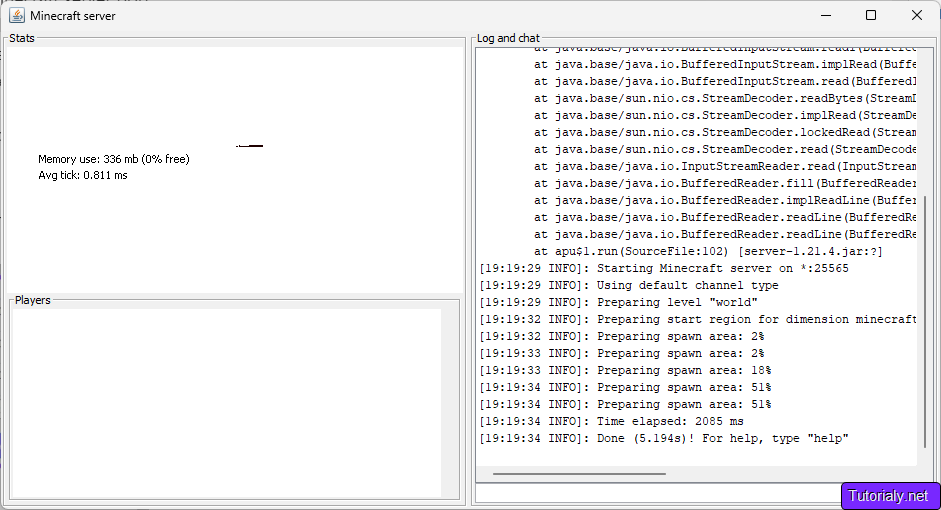
Step 4: Start Your Minecraft Server and Play with Friends
Now that your Minecraft server is set up and the port forwarding configuration is complete, it’s time to launch/restart the server and invite your friends to join. This is the most exciting part of the process, as you can now explore your custom world together!
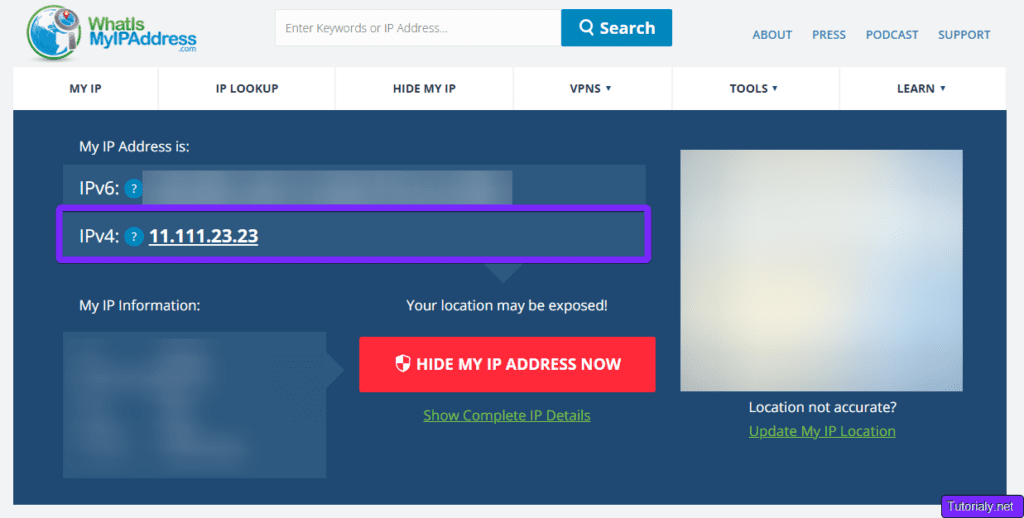
- Once the server started, open your browser and visit a site like WhatIsMyIP.com to find your public IP address. Combine your public IP with the server port (e.g.,
11.111.23.23:25565). Provide your friends with the server address so they can join your world.
💡Tip: Make sure the server port is added after your Public Address when joining the server.
To join the Minecraft server from a different network follow these steps:
- Open Minecraft and go to the Multiplayer menu.
- Click Add Server or Direct Connect.
- Enter the server address you provided in this format “YourPublicIP:25565” (e.g.,
11.111.23.23:25565) - Click Done or Join Server to connect.
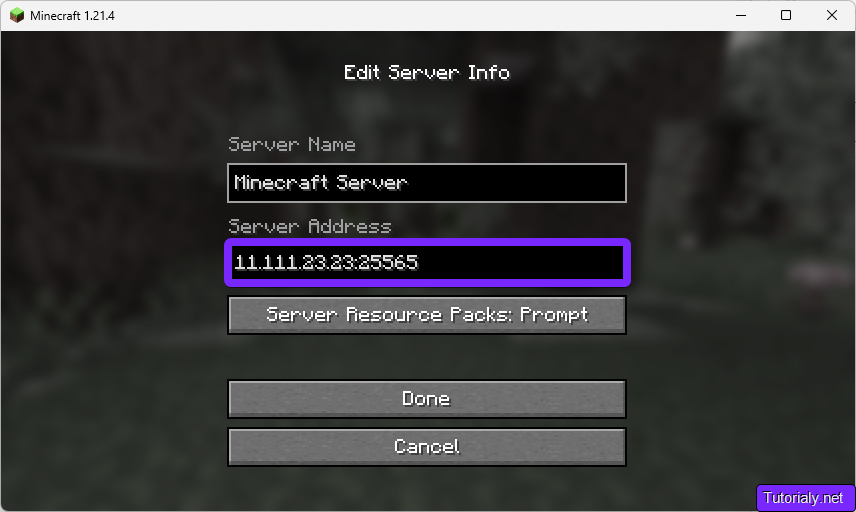
💡Tip If you are trying to join your own server try “localhost:25565” instead of the IP address.
Done!
Conclusion
Setting up a local Minecraft server with port forwarding opens the door to multiplayer fun, making your gaming experience more dynamic and enjoyable. With friends joining your custom world, every build, adventure, and battle becomes more exciting and unique.
In this tutorial, we’ve walked you through the essential steps to port forward a Minecraft server on Windows, macOS, and Linux. From configuring your server properties and firewall settings to navigating your router interface, we’ve covered everything you need to make your server accessible to players around the globe.
Port forwarding not only enhances your Minecraft gameplay but also empowers you with valuable networking skills. With your server up and running, you’re ready to explore endless possibilities with your friends.
Troubleshooting
1. Port Not Open
Use a tool like CanYouSeeMe.org to check if port 25565 is open. If it’s closed, ensure the server is running, the port forwarding rule is correct, and the router settings are saved.
2. Incorrect Router Configuration
Verify that the port forwarding rule points to your device’s static IP and includes both TCP and UDP protocols. Restart the router to apply changes if needed.
3. Firewall Blocking Connections
Ensure your firewall allows traffic on port 25565. Check your firewall rules for Windows, macOS, or Linux to confirm the port is not being blocked.
4. Dynamic IP Issues
If you didn’t set a static IP, your local IP might have changed. Update your port forwarding rule with the new IP or configure a static IP to prevent this from happening.
5. ISP Restrictions
Some ISPs block port forwarding. To fix this, contact your ISP to see if they allow port forwarding or consider using a VPN with port forwarding support as an alternative.
By resolving these common issues, you can ensure your Minecraft server is accessible for friends and ready for multiplayer gaming!
FAQs About Port-Forwarding a Minecraft Server
1. What is the purpose of port forwarding for a Minecraft server?
Port forwarding is essential for making your Minecraft server accessible to players outside your local network. It directs traffic from a specific port (e.g., 25565 for Java Edition) to the device hosting the server, allowing friends to connect from anywhere.
2. How do I know if I need a static IP for port forwarding?
You need a static IP if you plan to run your server regularly. Without it, your device’s IP address may change, breaking the port forwarding rules. A static IP ensures the connection remains consistent, saving you from frequent reconfiguration.
3. Why can’t my friends connect to my Minecraft server?
If your friends cannot join, check that the port is open using a tool like CanYouSeeMe.org. Ensure your server is running, the correct public IP and port are shared, and your firewall is not blocking connections.
4. Can I host multiple Minecraft servers on the same network?
Yes, but each server must use a unique port. Update the server-port in the server.properties file for each server and create separate port forwarding rules for those ports in your router.
5. Does port forwarding make my network less secure?
Port forwarding can expose your server to the internet, so it’s important to secure it. Keep your Minecraft server software updated, use strong passwords, and only share your server address with trusted players.


